This is the second post of my JavaFX tutorial series. In the previous post, we created a simple Hello World application and learned about JavaFX application lifecyle.
If you are a beginner in JavaFX and want to understand the basics, I encourage you to go through my previous post before reading this one.
In this post, We’ll create an interactive javafx application with multiple UI controls.
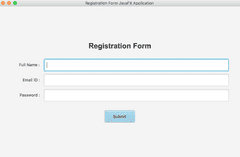
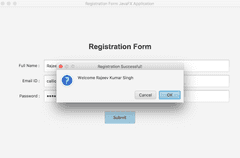
The application will have a registration form where users can enter their details and then submit the form. When the user submits the form, we’ll greet him by showing an alert box.
Here is a screenshot of the application that we are going to build in this tutorial -

What will you learn?
In this blog post, you’ll learn -
Cool! Let’s get started.
Create the Main Application class
The first thing you need to do is to create the Main class for your JavaFX application which extends javafx.application.Application , and override it’s start() method.
Open your favorite IDE and create a new Java project along with a class named RegistrationFormApplication with the following contents -
import javafx.application.Application; import javafx.stage.Stage; public class RegistrationFormApplication extends Application @Override public void start(Stage primaryStage) throws Exception primaryStage.setTitle("Registration Form JavaFX Application"); primaryStage.show(); > public static void main(String[] args) launch(args); > >Create the Layout of your application
JavaFX provides layout container classes, called panes, to easily manage the user interface of your application. Layout panes allow you to add UI controls and position them on the screen.
We will use a GridPane layout for designing our registration form. GridPane layout enables you to create a flexible grid of rows and columns in which UI nodes can be laid out.
Let’s create our Registration Form layout pane -
private GridPane createRegistrationFormPane() // Instantiate a new Grid Pane GridPane gridPane = new GridPane(); // Position the pane at the center of the screen, both vertically and horizontally gridPane.setAlignment(Pos.CENTER); // Set a padding of 20px on each side gridPane.setPadding(new Insets(40, 40, 40, 40)); // Set the horizontal gap between columns gridPane.setHgap(10); // Set the vertical gap between rows gridPane.setVgap(10); // Add Column Constraints // columnOneConstraints will be applied to all the nodes placed in column one. ColumnConstraints columnOneConstraints = new ColumnConstraints(100, 100, Double.MAX_VALUE); columnOneConstraints.setHalignment(HPos.RIGHT); // columnTwoConstraints will be applied to all the nodes placed in column two. ColumnConstraints columnTwoConstrains = new ColumnConstraints(200,200, Double.MAX_VALUE); columnTwoConstrains.setHgrow(Priority.ALWAYS); gridPane.getColumnConstraints().addAll(columnOneConstraints, columnTwoConstrains); return gridPane; >Whoa! Let’s understand what’s going on here.
We first instantiate a new GridPane, and then set the alignment and padding properties. We also add gaps between columns and rows of the grid pane by setting Hgap and Vgap properties.
I have also applied some column constraints to the grid pane. The ColumnConstraints constructor takes the min width , preferred width and max width values.
All the nodes in column one will have a min-width of 100, pref-width of 100 and max-width of Double.MAX_VALUE .
Similarly, all the nodes in column two will have a min-width of 200, pref-width of 200 and max-width of Double.MAX_VALUE .
Also, I have set the Halignment property to HPos.RIGHT in columnOneConstraints so that all the nodes in column 1 are right aligned.
Moreover, by setting Hgrow property to Priority.ALWAYS in columnTwoConstraints , we’re specifying that if the screen resizes, then column 2 should grow horizontally and fill in the extra space.
Let’s now create a scene with the registration form grid pane as the root node. Modify the start() method of the main class so that it looks like this -
@Override public void start(Stage primaryStage) throws Exception primaryStage.setTitle("Registration Form JavaFX Application"); // Create the registration form pane GridPane gridPane = createRegistrationFormPane(); // Create a scene with the registration form gridPane as the root node. Scene scene = new Scene(gridPane, 800, 500); // Set the scene in primary stage primaryStage.setScene(scene); primaryStage.show(); >If you run the application now, you’ll get an empty window of width 800 and height 500. In the next section, We’ll add UI controls to the application.
Add UI Controls to the layout.
JavaFX provides several built-in GUI controls like TextField, PasswordField, Button etc. Let’s add these UI controls to our registration form pane -
private void addUIControls(GridPane gridPane) // Add Header Label headerLabel = new Label("Registration Form"); headerLabel.setFont(Font.font("Arial", FontWeight.BOLD, 24)); gridPane.add(headerLabel, 0,0,2,1); GridPane.setHalignment(headerLabel, HPos.CENTER); GridPane.setMargin(headerLabel, new Insets(20, 0,20,0)); // Add Name Label Label nameLabel = new Label("Full Name : "); gridPane.add(nameLabel, 0,1); // Add Name Text Field TextField nameField = new TextField(); nameField.setPrefHeight(40); gridPane.add(nameField, 1,1); // Add Email Label Label emailLabel = new Label("Email ID : "); gridPane.add(emailLabel, 0, 2); // Add Email Text Field TextField emailField = new TextField(); emailField.setPrefHeight(40); gridPane.add(emailField, 1, 2); // Add Password Label Label passwordLabel = new Label("Password : "); gridPane.add(passwordLabel, 0, 3); // Add Password Field PasswordField passwordField = new PasswordField(); passwordField.setPrefHeight(40); gridPane.add(passwordField, 1, 3); // Add Submit Button Button submitButton = new Button("Submit"); submitButton.setPrefHeight(40); submitButton.setDefaultButton(true); submitButton.setPrefWidth(100); gridPane.add(submitButton, 0, 4, 2, 1); GridPane.setHalignment(submitButton, HPos.CENTER); GridPane.setMargin(submitButton, new Insets(20, 0,20,0)); >The gridPane.add() method takes the columnIndex , rowIndex , colSpan and rowSpan arguments. You can add UI controls to any cell in the grid by using these arguments. columnIndex and rowIndex starts from zero.
The headerLabel is placed on the first cell (columnIndex : 0, rowIndex : 0) and spans two columns. We have also added horizontal alignment and some margin to the headerLabel.
The Name, Email and Password fields are placed in subsequent rows. All the labels are placed in the first column and the input fields are placed in the second column.
Add the handler code that is executed on form submit.
Let’s now add our handler code to the submit button. This handler is invoked whenever you click Submit button, or press Enter key -
submitButton.setOnAction(new EventHandlerActionEvent>() @Override public void handle(ActionEvent event) if(nameField.getText().isEmpty()) showAlert(Alert.AlertType.ERROR, gridPane.getScene().getWindow(), "Form Error!", "Please enter your name"); return; > if(emailField.getText().isEmpty()) showAlert(Alert.AlertType.ERROR, gridPane.getScene().getWindow(), "Form Error!", "Please enter your email id"); return; > if(passwordField.getText().isEmpty()) showAlert(Alert.AlertType.ERROR, gridPane.getScene().getWindow(), "Form Error!", "Please enter a password"); return; > showAlert(Alert.AlertType.CONFIRMATION, gridPane.getScene().getWindow(), "Registration Successful!", "Welcome " + nameField.getText()); > >);The setOnAction() method is used to register an event handler to a UI control.
In the above handler code, we show an error alert if any of the form fields are missing, otherwise, we show a confirmation alert to the user.
We use JavaFX’s built-in Alert class to show the alert boxes to the user. Following is the implementation of showAlert() method. -
private void showAlert(Alert.AlertType alertType, Window owner, String title, String message) Alert alert = new Alert(alertType); alert.setTitle(title); alert.setHeaderText(null); alert.setContentText(message); alert.initOwner(owner); alert.show(); >Complete Code and Output
Here is the complete code for your reference -
import javafx.application.Application; import javafx.event.ActionEvent; import javafx.event.EventHandler; import javafx.geometry.HPos; import javafx.geometry.Insets; import javafx.geometry.Pos; import javafx.scene.Scene; import javafx.scene.control.*; import javafx.scene.layout.*; import javafx.scene.text.Font; import javafx.scene.text.FontWeight; import javafx.stage.Stage; import javafx.stage.Window; public class RegistrationFormApplication extends Application @Override public void start(Stage primaryStage) throws Exception primaryStage.setTitle("Registration Form JavaFX Application"); // Create the registration form grid pane GridPane gridPane = createRegistrationFormPane(); // Add UI controls to the registration form grid pane addUIControls(gridPane); // Create a scene with registration form grid pane as the root node Scene scene = new Scene(gridPane, 800, 500); // Set the scene in primary stage primaryStage.setScene(scene); primaryStage.show(); > private GridPane createRegistrationFormPane() // Instantiate a new Grid Pane GridPane gridPane = new GridPane(); // Position the pane at the center of the screen, both vertically and horizontally gridPane.setAlignment(Pos.CENTER); // Set a padding of 20px on each side gridPane.setPadding(new Insets(40, 40, 40, 40)); // Set the horizontal gap between columns gridPane.setHgap(10); // Set the vertical gap between rows gridPane.setVgap(10); // Add Column Constraints // columnOneConstraints will be applied to all the nodes placed in column one. ColumnConstraints columnOneConstraints = new ColumnConstraints(100, 100, Double.MAX_VALUE); columnOneConstraints.setHalignment(HPos.RIGHT); // columnTwoConstraints will be applied to all the nodes placed in column two. ColumnConstraints columnTwoConstrains = new ColumnConstraints(200,200, Double.MAX_VALUE); columnTwoConstrains.setHgrow(Priority.ALWAYS); gridPane.getColumnConstraints().addAll(columnOneConstraints, columnTwoConstrains); return gridPane; > private void addUIControls(GridPane gridPane) // Add Header Label headerLabel = new Label("Registration Form"); headerLabel.setFont(Font.font("Arial", FontWeight.BOLD, 24)); gridPane.add(headerLabel, 0,0,2,1); GridPane.setHalignment(headerLabel, HPos.CENTER); GridPane.setMargin(headerLabel, new Insets(20, 0,20,0)); // Add Name Label Label nameLabel = new Label("Full Name : "); gridPane.add(nameLabel, 0,1); // Add Name Text Field TextField nameField = new TextField(); nameField.setPrefHeight(40); gridPane.add(nameField, 1,1); // Add Email Label Label emailLabel = new Label("Email ID : "); gridPane.add(emailLabel, 0, 2); // Add Email Text Field TextField emailField = new TextField(); emailField.setPrefHeight(40); gridPane.add(emailField, 1, 2); // Add Password Label Label passwordLabel = new Label("Password : "); gridPane.add(passwordLabel, 0, 3); // Add Password Field PasswordField passwordField = new PasswordField(); passwordField.setPrefHeight(40); gridPane.add(passwordField, 1, 3); // Add Submit Button Button submitButton = new Button("Submit"); submitButton.setPrefHeight(40); submitButton.setDefaultButton(true); submitButton.setPrefWidth(100); gridPane.add(submitButton, 0, 4, 2, 1); GridPane.setHalignment(submitButton, HPos.CENTER); GridPane.setMargin(submitButton, new Insets(20, 0,20,0)); submitButton.setOnAction(new EventHandlerActionEvent>() @Override public void handle(ActionEvent event) if(nameField.getText().isEmpty()) showAlert(Alert.AlertType.ERROR, gridPane.getScene().getWindow(), "Form Error!", "Please enter your name"); return; > if(emailField.getText().isEmpty()) showAlert(Alert.AlertType.ERROR, gridPane.getScene().getWindow(), "Form Error!", "Please enter your email id"); return; > if(passwordField.getText().isEmpty()) showAlert(Alert.AlertType.ERROR, gridPane.getScene().getWindow(), "Form Error!", "Please enter a password"); return; > showAlert(Alert.AlertType.CONFIRMATION, gridPane.getScene().getWindow(), "Registration Successful!", "Welcome " + nameField.getText()); > >); > private void showAlert(Alert.AlertType alertType, Window owner, String title, String message) Alert alert = new Alert(alertType); alert.setTitle(title); alert.setHeaderText(null); alert.setContentText(message); alert.initOwner(owner); alert.show(); > public static void main(String[] args) launch(args); > >Following is the final form (Pretty! isn’t it?) -

Once user clicks submit, a confirmation alert is shown -

Showing error if any form field is missing -
 form error example" width="" height="" />
In this blog post, we learned about JavaFX layout design and created a nice looking interactive registration form using GridPane layout. The code for the Registration Form application can be found on my github repository.
In the next blog post, I’ll show you how to build the same application using JavaFX FXML.
Thank you for reading. Please ask your doubts in the comment section below.